Decorations and other home goods that are made of wood are becoming popular now. One popular craft is burning a design into wood. It takes some practice to be able to get the designs to come out just right. They do make for good arts and crafts projects along with woodworking projects.
Companies that make wooden household items will burn their logo into the item as it will last longer than painting it on or using a sticker. People are also making decorative items at home with new and easy ways to burn a design into wood.
Pattern Types
It has been proven that the best patterns to use when burning something into wood should have defined lines. Examples of these kinds of designs are maps, outlines of shapes, and text. Using outlines is always the best option even on large lettering as it saves ink and time. Once the outline is burned in, the rest can always be filled in after everything else is done.
Transfer Methods
There are a lot of different methods for transferring a pattern onto wood before burning the design in. It is always advised to pick the method that works best for the artist. That means there must be some trial and error until the best method is determined.

Now, a lot of people will just use the method that is included in the wood-burning kit they buy (and, by the way, we’ve prepared a detailed buying guide for the best wood burning kit). However, many find this method does not work as well for them.
1. Transfer Tip Transferring
This method is not a very detailed one and the instructions usually come with the tool. The first thing you must do is to print your desired design off. This step can be a little tricky for hobbyists and first-time wood burners as it requires using a laser printer, which is not something people usually have at home.
You must first print the design off backwards for this to work. Once the design is printed, place it onto the piece of wood with the ink side of the paper face-down on the wood. Next, rub the transfer tool over the back of the paper until the ink has been fully transferred. Once this is done, the paper can be removed and thrown away.
2. Plastic Sheet Transferring
It is key that this method is done using a plastic sheet as it is a nonabsorbent material. This is important because it means the ink from the design will not stick to the paper and can be easily transferred. Now, there is no such thing as plastic paper that can be just bought and run through the printer.
You must buy a plastic sheet and cut it down to the size of a piece of paper. Once it is the right size, you can feed it into an inkjet printer, which is the one commonly found in most homes. The design must be printed off backward so that it will be transferred in the right direction.
Once the design has been printed off, place the ink side of the paper onto the piece of wood. Then rub over the backside, and since the paper is nonabsorbent, the ink will come right off and onto the wood. This is one of the easiest ways to get an extremely clear transfer of lines.
One thing that makes this method stand out is that it is very cost friendly as the plastic sheet can be washed to remove any ink residue and reused once it is dry.
3. Sharpie Transferring
This method tends to not come out as clear as the first two, and it works best with a brand new sharpie that bleeds a lot when used. For this method, you can use any type of printer you have on hand, and the design must be printed in the normal direction. It also does not require any particular type of paper.
Plain paper will make it easier to complete this method. Once you have printed the design, lay the paper onto the wood with the design facing upward. Now, trace over the design slowly using a sharpie. As the sharpie is going over the design, the extra ink from the sharpie will sink through the paper and onto the wood.
The best way to get the most ink through is to press firmly while tracing the design. You can use some pieces of tape to help keep the paper from moving while you trace.
4. Isopropyl Alcohol Transferring
This method requires that the design be printed using an inkjet printer, which is the common one found in homes. The design needs to be printed off backward for this method so that the ink will be on the side pressed to the wood. Once the pattern is printed and laid on the piece of wood, you can add the isopropyl alcohol to the paper.
It is best to use a q-tip for adding the alcohol as it makes it easier to control how much is added and where. You do not want the board to be soaking wet because it could make the ink spread. Apply the q-tip over the design, spreading alcohol all over the lines. The alcohol will cause the paper to release the ink, which will then soak into the wood.
One must keep in mind when using this method that once the ink has dried it will no longer be black. The alcohol will turn the ink into a yellowy color once it is dry.
5. Stamp Transferring
This is not the best method for businesses or someone just starting a business as the design wanted might not be found in a stamp. If this is your desired method however, you can easily find a company that will make a custom stamp or stamps of the design you wish to use.
This is a perfect method for hobbyists though as there are plenty of stamp designs to be found. When using this method, it is highly advised to use light-colored ink so that it will not interfere with the burning process. This is a tricker method for more than one reason.
One of the reasons is that ink can easily bleed if applied incorrectly to the wood. The type of wood used is also important to help prevent any bleeding and allow the ink to transfer well. For example, you must use a completely flat piece of wood because a stamp cannot reach down into any pits or curves that might be found in natural wood.
Another issue is that the ink used needs to be a light color in case there is any bleeding and that very little ink can be used. It can be hard to get just a little bit of ink onto a stamp without being so little it will not show up at all when pressed. For this method, all you must do is select your stamp and light color ink.
Once these are done, the stamp should be dipped lightly into the ink. You can use a piece of paper to get the extra ink off the stamp before it is used on the wood. Then, place the stamp on the wood and press firmly and evenly. Pull the stamp straight off, do not rock it to any side or there is the risk of extra ink coming off onto the side last removed from the wood.
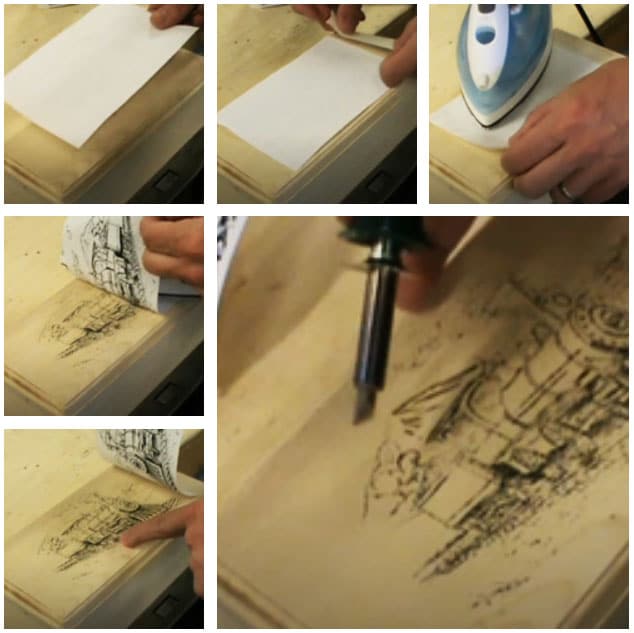
6. Iron Transferring
You should use an inkjet computer to print off the pattern, and print it off backward. Once you have printed the design, lay it ink side down onto the piece of wood. An clothes iron will work for this method as long as the steam setting can be turned off.
Once you have placed the printed image on the wood and taped it into place so it will not move, you should carefully run the the iron over the paper. The iron must never touch the tape as it will melt it right into the wood, causing damage that is not easy to fix. The ironing should only last for about thirty seconds, and once it is done, you should slowly and carefully peel the paper backward but not off.
You should check the design before you peel it off as it can be ironed again if part of the design did not transfer fully. One of the most important things to keep in mind for this method is that the iron cannot be so hot it turns the paper brown because that means the wood will turn brown as well.
7. Transfer Paper Transferring
This is the best method for people who do not have a lot of money to spend on supplies as most people have everything already. The pattern needs to be printed onto a thin piece of paper, but you must use the right kind of paper: transfer paper, graphite paper, or carbon paper. A fine point pen or very sharp pencil is also needed as well as some tape.
Once the pattern has been placed onto the thin piece of paper, backward, the side with the design should be placed down onto the wood. Now, this next part is just like the sharpie method that was discussed previously. Once the design is taped in place, trace over the pattern using the pen or pencil.
The tracing needs to be firm to allow enough of the design to transfer. Once the design is traced, the paper should be partially peeled up to make sure the whole design is transferred enough. It can be traced again to get more of the design, but this method will leave the lightest of all patten on the wood.


